
Summer Classes

It’s that time of year again! Kids classes here at Botbyl Pottery are about to be in full swing! Last year, we began a new series of clay projects which highlighted a different ceramic culture and technique each day. Continuing on that theme, this year we will be featuring several different countries and continents. For 4 days we will handbuild, learning techniques such as coil- building, pinching, and slab- building. On Friday, each student will have a chance to make a piece or two on the potter’s wheel (always a highlight!)
Monday: Australia (aboriginal)
Tuesday: Africa
Wednesday: Southeastern United States (face jugs)
Thursday: TBA ( I am researching some European techniques currently)
Friday: Wheel- Throwing
Cost: $150/ student for a week long session. Sibling discount of $50 for each additional sibling.
Ages 6-13
Classes meet M-F from 9-11 am. at Botbyl Pottery and Companion Gallery, located behind Crown Winery.
For additional information please call Kelsey Nagy:
901.482.5198
Will also offer a weeklong teen wheel throwing class upon request.
Parents are invited to participate with their child.
Come join us this summer! I am excited about these new projects and can’t wait to see the final products!

Cloud Forms

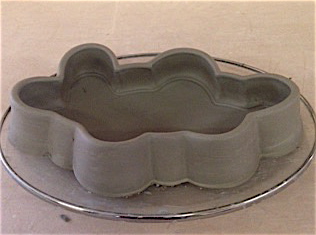
After drawing “cloud” forms on my pots for several years now, it only makes sense to eventually have them jump off the pot and become the pot. I begin with a slab set into a slumped mold. This particular one is about 9″ across. Then, I sketch in the cloud form that will be the perimeter of the piece. Although I’m still figuring the process out, I enjoy combining elements of handbuilding and wheel-throwing.

Then, I cut the outline of the piece, removing the excess clay.

To create the walls of the piece, I throw a ring (about 1.5″ tall) on the wheel. Once the ring has firmed up some, I cut each section of the cloud; fitting the entire wall together before attaching any pieces.

All the pieces have been cut. I like to cut the ends at a bevel so that the attachments are uniform easier to secure.
All the sections have been firmly attached to one another and to the base. I then use a fettling knife and a firm rib to compress each section together. I smooth both the interior and exterior. In addition to making for a better look, this step helps prevent cracking at the attachments.

Once the piece is leather hard, and everything has been smoothed, I put it back on the wheel to attach a pedestal foot. Here it is with score marks waiting for a coil.

Then, I attach a thick coil. The ends are cut so that one side fits into the other, like a snake biting its’ tail.

The coil gets thrown into a pedestal foot. Once it is removed from the wheel, it is placed on a piece of foam for drying.

Here is one of the finished products. This piece has a much taller and unscalloped foot.

Here is one of the finished products. You can really get a sense of the curve from the side view. This foot is shorter and wider. After making a few of these, I’m leaning more towards a taller foot.
Debunk the Funk
As an artist/creative person, one of the hardest things for me is dealing with the funk. The funk inevitably arrives much like an ill-timed writer’s block; hot on the heels of a creative spurt, and hindering the progress of what’s to come. At times like this, with blocks of clay taunting me to inactivity, the best thing for me to do is leave. Staring at large quantities of clay and hopelessly asking myself, “where to begin?,” is a surefire way to fall deeper into the funk. Allowing myself the freedom to come and go and not bind myself to a strict schedule is difficult for my routine-oriented self. Sometimes you need to be reminded that time in the studio is only a fraction of the total process. What I make is a direct reflection and compilation of all facets of my life.
So on Thursday, the day of My Great Funk, I left the studio. This is what I did

I went running on the trails with one of my best friends.

I worked on my reading, I always read several books of different genres simultaneously, this is my current list.

There is a corner of my living room entirely devoted to bisqueware, I lovingly call it my “Bisquegarten” (obviously it would be German). This is an ongoing project that received some much needed attention.

These are some pieces I glazed on Thursday. Glazing is a huge time commitment in my work, but I always relegate it to a side activity, almost a hobby. Reminding myself that this is an equally important and valuable aspect of my studio practice, despite it taking place in my living room rather than the actual studio is vital.
#switchitup2015


Each year at the studio (http://companiongallery.com/), we start January off with a look at the extensive mug collection of Eric Botbyl. It is a really neat thing to see mugs sprawling across the wall, and our students critiquing and imitating works of other potters from across the U.S. As the studio apprentice, I have seen this exercise performed several times and always look forward to the interesting results. This past week, I finally jumped on board. Having just finished a series of mugs in my usual (quasi boring/familiar) form, I decided to pick a mug to very loosely imitate.

This mug is by Aaron Sober, circa 2009, I have always admired the girth paired with the gentle angles. The mug on the left is one of my efforts.

Three variations on a common theme. Experimenting with the various proportions and handle placement.
Throwing in this vein opened up a whole new world for me. While not trying to directly emulate Sober’s mug, it was an exciting challenge to replicate it in a way that was my own. It was so relaxing and FUN to sit down and throw the same form to all different heights and widths. For the past few years, I have locked myself in to thinking that when throwing with a certain amount of clay, the results should always be the same: same height, same width, same squeaky clean surface. During this time of throwing, I tried to really relish the clay and leave some of the markings on the surface of the pot. Going forward in 2015, I am looking forward to testing out new and (slightly) more intuitive forms.

Just a quick view of the mug collection all set up!
Tennessee Craft, Round 2- a Preview

Here are a few preview images for this year’s Fall Tennessee Craft, September 26-28.
As I prepare to leave for Nashville and Tennessee Craft in 2 days (!) I am reminded of this time last year, and the sharp contrast to this Fall. Last year, I was frantically sanding, trying to get my booth finished in time. In between crying, carpentery, and removing wood stain from my face, I was packing for my first ever crafts fair. This Fall, I am preparing for my 3rd fair now, and feel slightly more prepared. Everything is built, sewn, bags are bought, and wrapping will commence tomorrow. I am excited about the changes in my work over the past year, and looking forward to displaying them this weekend!

A new canister set with the mosaic pattern!

Sweet little butter dish

Time for Tea! Teapot with scalloped foot

One of several new stackable bowl sets. A numbering system on the bottom of each bowl helps keep them in order.

Several new pedestal bowls, perfect for fall fruits and snack mixes!

Large Scalloped Pot

Several new flower bricks, perfect for Fall mums and foliage…and then poinsettias!
I am really looking forward to Tennessee Craft this weekend, September 26-28 in Centennial Park, Nashville.
Come find me in Booth B16 just behind the concessions!
From this to that

Yellow Oval Vase, beginnings of a new design. It is always so interesting to me to see how one idea will merge into another and become something unique. Many of the patterns and designs on my work are consistent, varying slightly, and morphing slowly. Other times, a new pattern happens by surprise, uninvited, yet a welcome change. This new design was one of those changes. Although the majority of my work is bold, brightly colored underglazed pieces, I also have many all white pieces. On this work, I either simply carve patterns or SLIP TRAIL. When slip trailing, I was making patterns like the above, but with white raised texture. My favorite part of this process is watching this begin as colored “jumpers” outlining a piece. Then, move to white slip trailed tendrils. And then, to go back to the colored underglazes, but now making the same patterns that I made in all white.

Set of tumblers

Simple Yellow Mug

Baby Bud Vase

Scalloped Pedestal Bowl
Kids Summer Camp 2014

Last summer, we had so much fun with our kids classes! I am so excited to be gearing up for another great summer with a few new project additions!
As our summer camps will begin here in just a few short weeks, I am excited to have a few new projects this year! This summer, each day we will dive in to a different ceramic culture, and create our own variations of Greek, Chinese, North American, and Japanese traditions. So here’s the rundown:
Monday: Japanese pottery, Jomon technique, rope impressions
Tuesday: Greek pottery, black and red sgraffito technique
Wednesday: North American, geometric designs created with a wax resist
Thursday: Chinese pottery, we will use animals to create parts of our pots, such as handles or spouts, zoomorphic
Friday: Each student will get a turn on the potter’s wheel
Each class is 1 week long. We meet M-F from 9 am- 11 am.
Cost is $150/ child for the week. This includes all the materials needed, and firings.
We offer a $50 discount for each additional child.
1 child = $150, 2 children = $250
I am very excited about getting our kids classes going again. We always have a lot of fun, and the kids come away with some great pieces!
For more information, please call:
Kelsey Nagy: (901) 482.5198
Dining in Style

So excited to make a bridal dinnerware set for some of my dear friends! This simple stoneware set challenged me to work in a completely different vein, which I really enjoyed.


Looking at the sets all together, my favorite element is the dark ash glazed backs. When first thinking about trying to glaze the plates like this, I thought “that’s not possible”, but I am so pleased with the result. The plates were painted on the back with a coat of latex. Then, the entire plate was glazed in white. After the white glaze dried, the latex was removed. This step left the top and edge of the plate white, but not the back. Then the whole plate was glazed in a dark ash glaze.
new pots for Christmas!
Well, it seems that I’m finally back in the swing of things after a temporary post-craft fair slump! Good thing, since the Christmas season is officially here!

Christmas gravy?

A cup of Christmas cheer? (A firework beer stein during the other 11 months)

A festive serving bowl!

Blue and White pedestal bowl


Carved Gravy Boat
Excited about this holiday season!
Find me on Facebook: https://www.facebook.com/kelsey.nagy.10
Out of town?, check out my Square Marketplace: https://squareup.com/market/kelsey-nagy-pottery
TACA Booth Shots

Finally here at TACA! Booth set up, and ready to unpack those pots. Thankfully, the sun is out!
Got to drive right up to my spot!
 Got some of my little clear guys all set up in the corner, still unpacking….

Almost done, still have a few bins left to unload!
It’s wild that this is finally coming together; booth, pots, the whole 9 yards- feeling like a real potter!
Come see me:
Centennial Park, Nashville
September 27, 28, 29
