
Cloud Forms

After drawing “cloud” forms on my pots for several years now, it only makes sense to eventually have them jump off the pot and become the pot. I begin with a slab set into a slumped mold. This particular one is about 9″ across. Then, I sketch in the cloud form that will be the perimeter of the piece. Although I’m still figuring the process out, I enjoy combining elements of handbuilding and wheel-throwing.

Then, I cut the outline of the piece, removing the excess clay.

To create the walls of the piece, I throw a ring (about 1.5″ tall) on the wheel. Once the ring has firmed up some, I cut each section of the cloud; fitting the entire wall together before attaching any pieces.

All the pieces have been cut. I like to cut the ends at a bevel so that the attachments are uniform easier to secure.
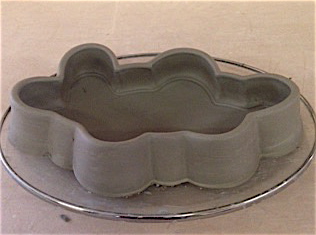
All the sections have been firmly attached to one another and to the base. I then use a fettling knife and a firm rib to compress each section together. I smooth both the interior and exterior. In addition to making for a better look, this step helps prevent cracking at the attachments.

Once the piece is leather hard, and everything has been smoothed, I put it back on the wheel to attach a pedestal foot. Here it is with score marks waiting for a coil.

Then, I attach a thick coil. The ends are cut so that one side fits into the other, like a snake biting its’ tail.

The coil gets thrown into a pedestal foot. Once it is removed from the wheel, it is placed on a piece of foam for drying.

Here is one of the finished products. This piece has a much taller and unscalloped foot.

Here is one of the finished products. You can really get a sense of the curve from the side view. This foot is shorter and wider. After making a few of these, I’m leaning more towards a taller foot.
